Exonum Light Client Tutorial
In this tutorial we describe how to use the light client to interact with Exonum services. The tutorial extends the Advanced Cryptocurrency tutorial.
Light client is a JavaScript library used for a number of purposes:
- forming and sending transactions to the blockchain
- creating digital signatures over transactions
- obtaining and checking cryptographic proofs of data authenticity and integrity.
Below we will provide you with the detailed description of how said functionality is executed in Exonum light client.
Note
Light clients are also available in other languages: Java and Python. See their readme files for more details.
Before You Start
To start using Exonum light client, include exonum-client into your JavaScript application:
# using NPM
npm i --save exonum-client@latest
Note that different versions of the client support different releases of the Exonum framework. The compatibility table can be found in the readme file of the client.
Execute a Transaction
A transaction is an atomic operation that introduces changes to the blockchain state. The structure, contents and number of transaction types within one service vary depending on the business logic of each service.
The general algorithm of executing a transaction in Exonum includes several stages:
- Define a schema of the transaction payload with Protobuf
- Generate a signing key pair, or load it from local storage
- Define transaction type
- Define transaction payload
- Sign the transaction
- Send the transaction to the blockchain.
Exonum light client uses Protobuf as the data serialization
format. This is enabled by the protobufjs library.
With this library you can describe data either through .proto files or using
reflection:
-
The first method assumes that the transaction schema is defined in a
.protofile. Then a corresponding.jsfile (a stub) is generated out of the.protofile. This method is more common for large-scale projects, since Protobuf declarations are shared with the backend (that is, services written in Rust or Java). -
In the reflection method the
.protodefinitions are specified directly in JavaScript. This method may be applicable for quick-and-dirty testing, but is less maintainable.
Below we provide a complete workflow of transaction execution based on the transfer transaction from the Advanced Cryptocurrency tutorial.
Define Transaction Schema
The Transfer transaction has the following Protobuf Declaration:
message Transfer {
  // Address of receiver's wallet.
  exonum.crypto.Hash to = 1;
  // Amount of currency to transfer.
  uint64 amount = 2;
  // Auxiliary number to guarantee non-idempotence of transactions.
  uint64 seed = 3;
}
Note
seed allows to execute the transfer with the same parameters
(e.g., “transfer 50 tokens to Bob”) multiple times.
You can generate seed as follows:
const seed = exonum.randomUint64()
As the .proto file is ready, generate the JavaScript module as follows:
pbjs --keep-case \
  --target static-module \
  --root cryptocurrency \
  --path node_modules/exonum-client/proto \
  example.proto \
  --out ./proto.js
Here:
--keep-caseopts out of transforming field names--targetspecifies the output type (in our case, we want a standalone JS module)--rootspecifies a namespace for the generated types. Without this option, the types may clash with the Protobuf types used by the light client library, which will lead to errors--pathadds a directory to the include path (we specify a path to the Protobuf declarations bundled with the client library)example.protospecifies an input file--outspecifies the name of the output module
Define Transaction Type
Define Transfer transaction schema and its fields:
import * as exonum from 'exonum-client'
import * as proto from './stubs'
const { cryptocurrency_advanced } = proto.exonum.examples

// Numeric identifier of the cryptocurrency service
const SERVICE_ID = 101
// Numeric ID of the `Transfer` transaction within the service
const TRANSFER_ID = 0

const Transfer = new exonum.Transaction({
   schema: cryptocurrency_advanced.Transfer,
   serviceId: SERVICE_ID,
   methodId: TRANSFER_ID,
})
Besides schema, serviceId and methodId fields specify information necessary
to dispatch transaction to the service. serviceId is assigned
during service instantiation;
you can find it out via an endpoint in
the system API plugin.
Method identifiers are specified in the service interface.
Note
As of Exonum 1.0, service interfaces do not have a language-independent form, so there is no easy way to get correspondence between method IDs and Protobuf messages. Implementing an IDL for interfaces is in the project roadmap.
Specify Transaction Payload
Prepare the transaction payload according to the above-defined schema:
// Assume keys for both wallets are specified as follows:
const alice = exonum.keyPair()
const bob = exonum.keyPair()
// Recall that we use addresses in the service, not public keys!
const bobAddress = exonum.publicKeyToAddress(bob.publicKey)

const transferPayload = {
  to: { data: exonum.hexadecimalToUint8Array(bobAddress) },
  amount: 50,
  seed: exonum.randomUint64()
}
publicKeyToAddress function provides a handy way to convert
a hex-encoded public key to
an address.
Sign Transaction
Now, the transaction can be signed using a static method in Transfer:
const transaction = Transfer.create(transferPayload, alice)
This will create a transaction object conforming to the following generic TypeScript interface:
interface Verified<T> {
  // Schema of the payload defined as a `protobufjs` type.
  schema: protobufjs.Type;
  // Parametric payload.
  payload: T;
  // Hex-encoded Ed25519 public key (64 hex digits).
  author: string;
  // Hex-encoded Ed25519 signature (128 hex digits).
  signature: string;
  // Serialized Protobuf message in the format defined by Exonum.
  bytes: Uint8Array;

  // Returns serialized message.
  serialize(): Uint8Array;
  // Returns hex-encoded SHA-256 digest of the serialized message.
  hash(): string;
}
In case of Transfer, type param T is the transaction payload
we have specified above, which roughly corresponds to the following type:
type TransferPayload = {
  to?: { data: Uint8Array },
  amount?: number | string,
  seed?: number | string,
}
Send Transaction
Finally, send the resulting transaction into the blockchain.
This can be performed with the help of send async function:
const serialized = transaction.serialize()
const transactionHash = await exonum.send(explorerPath, serialized)
explorerPath represents API address of the transaction handler in the
explorer service, such as
const explorerPath = 'http://127.0.0.1:8200/api/explorer/v1/transactions'
Alternative: Define Schema with Reflection
protobufjs package allows to define Protobuf types in runtime.
Beware that this is more prone to errors and should only be used
as a last resort.
import { Root, Type, Field } from 'protobufjs'

const root = new Root().define('cryptocurrency')
const Hash = new Type('Hash').add(new Field('data', 1, 'bytes'))
root.add(Hash)

const TransferSchema = new Type('Transfer')
  .add(new Field('to', 1, 'cryptocurrency.Hash'))
  .add(new Field('amount', 2, 'uint64'))
  .add(new Field('seed', 3, 'uint64'))
root.add(TransferSchema)
In this case, the transaction type will be specified as
const Transfer = new exonum.Transaction({
  schema: TransferSchema,
  serviceId: SERVICE_ID,
  methodId: TRANSFER_ID,
})
Cryptographic Proofs
The idea behind this functionality is one of the core features of the light client. Whenever you want to check the presence of some data in the blockchain, a request is made with the light client. The response to the request should contain your data together with either a cryptographic proof for it or a corresponding error, if such data is absent in the blockchain for some reason.
In other words, a cryptographic proof is a response to the read request made through the light client that:
- validates authenticity of the included data
- certifies that said data is safely stored in the blockchain.
In the same way as transactions, data proofs provided by Exonum light client have a general common structure but, depending on service business logic, some extra custom parts may be included in the proof.
The proof itself comprises several levels and, when checked, unfolds from the highest level down to the lowest one. These levels are represented by the requested data. The highest level corresponds to the blockchain state hash included into the block header returned by the node:
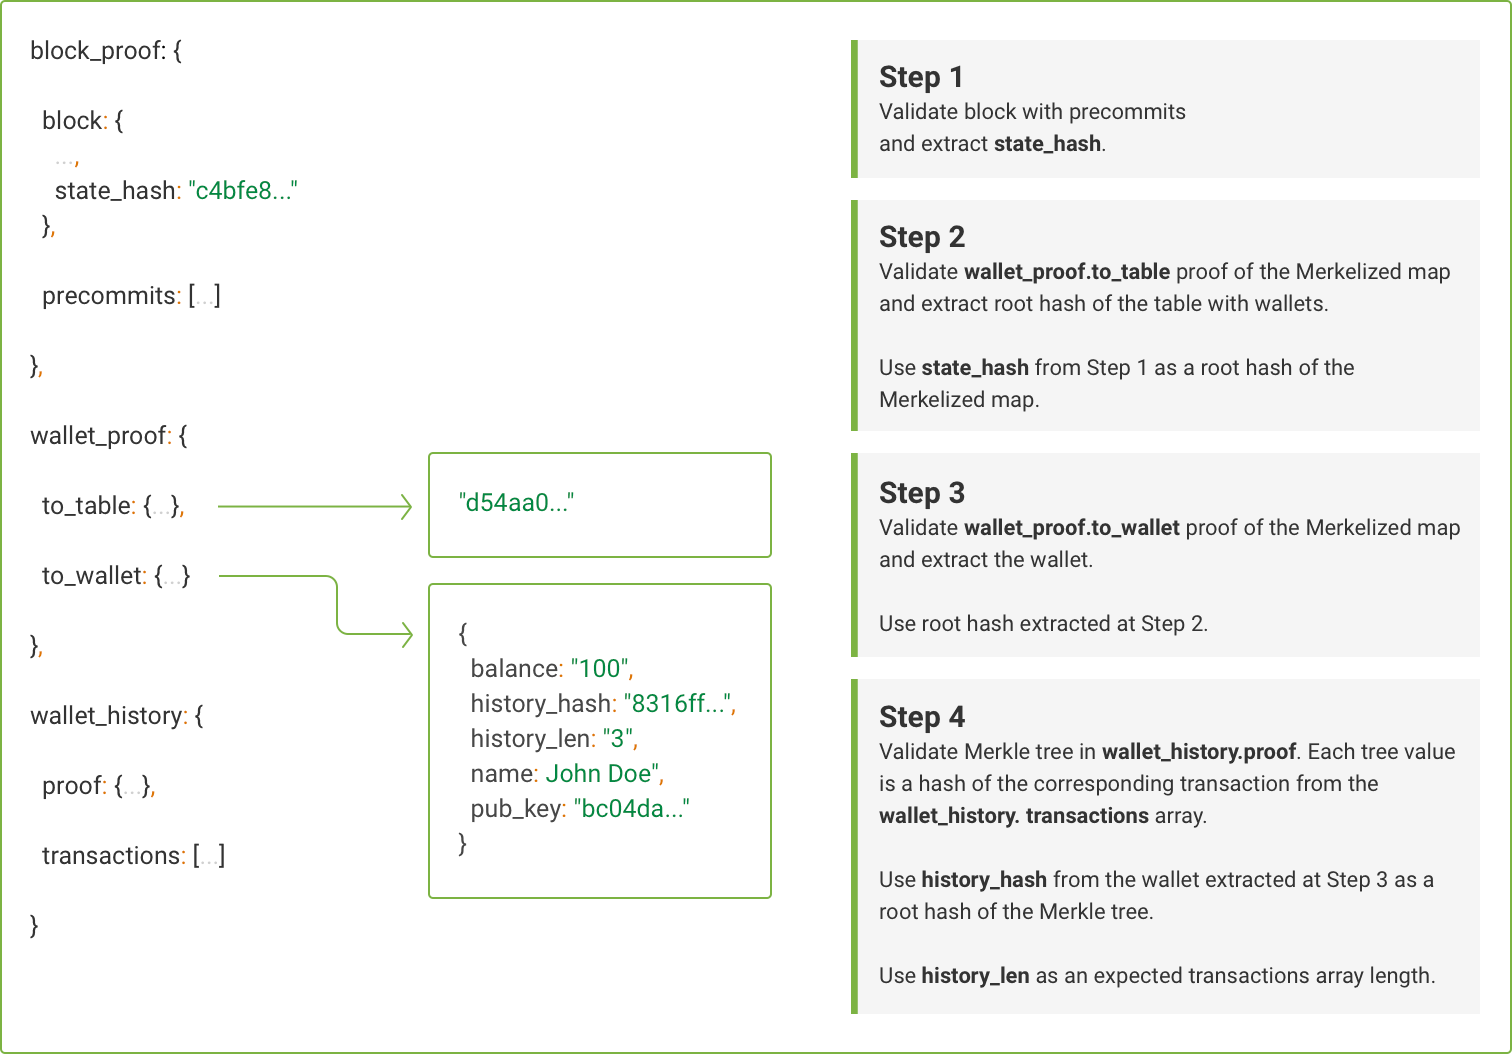
Getting Validator Keys
First of all, we check that the block containing our data is correct. For this purpose, we can load the actual list of public keys of the validator nodes stored in the global configuration. These keys will be used to assert that the data received from the blockchain was indeed agreed upon by all the member nodes in the network.
const { data } = await axios.get(
  '/api/services/supervisor/consensus-config',
)
const validatorKeys = data
  .validator_keys
  .map(({ consensus_key }) => consensus_key)
Getting Proof
Now make a request for the data on a particular wallet together with its proof. Note, that we identify the wallet by its public key which is in fact the public key of its holder:
const { data } = await axios.get(
  `/api/services/cryptocurrency/v1/wallets/info?pub_key=${publicKey}`,
)
Here, publicKey is the public key of the wallet we are interested in.
Verifying Block Authenticity
As soon as we get the data, we verify the block authenticity according to the downloaded set of keys of the validators:
const { block } = data.block_proof
try {
  // Will throw if an error during verification occurs
  exonum.verifyBlock(block, validatorKeys)
} catch(e) {
  console.error(e)
}
Verifying Table Proof
Next, we need to obtain the hash of the wallets table. The table hash is automatically aggregated into the state hash mentioned in the block header. Thus, we check the presence of the wallets table in the service like this:
const tableRootHash = exonum.verifyTable(
  // Proof of table inclusion
  data.wallet_proof.to_table,
  // State hash in the verified block
  block.state_hash,
  // Full name of the wallets table, including the name
  // of the cryptocurrency service (`crypto`)
  'crypto.wallets',
)
Verifying Wallet Proof
The next proof level verifies the existence of a particular wallet in the blockchain state.
First, recall the Wallet type declaration from
the tutorial:
message Wallet {
  exonum.crypto.Hash owner = 1;
  string name = 2;
  uint64 balance = 3;
  uint64 history_len = 4;
  exonum.crypto.Hash history_hash = 5;
}
We can use the pbjs binary from the protobufjs module
to translate it to a JS module, like we did for Transfer
above. We then wrap the generated JS type into an Exonum helper:
const { cryptocurrency_advanced } = proto.exonum.examples
const Wallet = exonum.newType(cryptocurrency_advanced.Wallet)
Then, we verify the proof down to the requested wallet:
const walletProof = new exonum.MapProof(
  // JSON proof data
  data.wallet_proof.to_wallet,
  // Type of keys in the wallets map
  exonum.MapProof.rawKey(exonum.Hash),
  // Type of values in the wallets map
  Wallet,
)
Note the use of MapProof.rawKey; as mentioned in
the advanced tutorial, we use
the raw key transform
for keys in the wallets table.
We also need to check that walletProof.merkleRoot – the root hash
of the wallets table restored from the proof – coincides with tableRootHash
we obtained at the previous level. In this way we can link two parts
of the proof together:
if (walletProof.merkleRoot !== tableRootHash) {
  throw new Error('Wallet proof is corrupted')
}
If the above checks are passed, we can safely extract wallet data from the proof:
const address = exonum.publicKeyToAddress(publicKey)
const wallet = walletProof.entries.get(address)
if (!wallet) {
  throw new Error('Wallet not found')
}
Verifying Wallet Transactions
The proof we are investigating contains another level:
transactions concerning a specific wallet (aka wallet history).
The wallet history is stored in a merkelized list
and the list hash is saved to Wallet as the history_hash field.
Notably, the list does not contain transactions themselves, but
only their hashes; because of collision resistance, hashes uniquely
determine transactions.
const verifiedTransactions = new exonum.ListProof(
  // JSON proof data
  data.wallet_history.proof,
  // Type of values in the proof
  exonum.Hash,
)

// Convert the history hash from the Protobuf-compatible format
// returned by the endpoint, to a hex string.
let expectedHash = new Uint8Array(wallet.history_hash.data)
expectedHash = exonum.uint8ArrayToHexadecimal(expectedHash)
// Check that the proof is tied to the previous level.
if (verifiedTransactions.merkleRoot !== expectedHash) {
  throw new Error('Transactions proof is corrupted')
}
In our example, the endpoint should return all transactions for the wallet. Since we rely on this fact in the following code, we will check this first:
const validIndexes = verifiedTransactions
  .entries
  .every(({ index }, i) => i === index)
if (!validIndexes) {
  throw new Error('Invalid transaction indexes in the proof')
}
Next, we validate each transaction. For this purpose we iterate over them and check their structure in several steps. This check allows us to confirm that a transaction of a certain type is present at a definite place in the array.
In our example, for the sake of brevity, we provide structure
definition of only one transaction type, Transfer.
// Transfer transaction definition (same as previously)
const Transfer = new exonum.Transaction({
  schema: cryptocurrency_advanced.Transfer,
  serviceId: SERVICE_ID,
  methodId: TRANSFER_ID,
})

let index = 0
for (let transaction of data.wallet_history.transactions) {
  // Deserialize a transaction from bytes. This will also check
  // transaction signature.
  const bytes = exonum.hexadecimalToUint8Array(transaction)
  const parsed = Transfer.deserialize(bytes)

  // Calculate a hash of the transaction and compare it with the
  // corresponding hash in the array of transaction hashes.
  const expectedHash = verifiedTransactions.entries[index++]
  if (parsed.hash() !== expectedHash) {
    throw new Error('Invalid transaction hash')
  }
}
Conclusion
We have described all the functionality required to interact with an Exonum service through the light client so far.
Well done! You have now equipped your application with a full-stack Exonum-based support!